
Alice Schlein’s fall 1998 contribution to the Complex Weavers Computer Aided Design Exchange study group was “False Satin for Network Drafting.” It intrigued me because the design process she used was similar to that used to design Jacquard weaves. I decided to try designing for my own 24 shaft mini-Jacquard loom using tools readily available to personal computer users rather than a high end CAD system.
In Jacquard class, I had been introduced to a type of fabric simply referred to as “weft backed.” A weft backed fabric has a compound structure with one warp and multiple weft colors. that usually cover its entire surface. Currently unused wefts are carried on the back of the cloth. To allow freedom of design while eliminating long floats, the back wefts are stitched at regular intervals. Weft backed weaves are normally based on 10 shaft or greater satins to allow ample room for the introduction of stitching points.
When designing cloth for a Jacquard loom, it’s important that areas crossing repeat boundaries contain weaves that divide evenly into the loom’s repeat size. With a horizontal repeat size of 24 ends, I decided to use a 12 shaft satin as the basis for my weft backed cloth’s weave structures. Similar weft backed weaves based on 8 shaft satins would probably work on a 16 shaft loom.
To reduce the bulkiness of my mini-Jacquard cloth, I chose to only use two weft colors and have warp dominant areas provide a third color for my cloth. To design a weft back weave for two weft colors, start with a filling faced base weave (fig.1), insert picks to carry the second weft on the back of the fabric (fig.2) and add sinkers to stitch the second weft to the fabric (fig.3). These stitch points are added midway between the risers that stitch the top weft to the front of the fabric so they will be hidden by the top weft as much as possible.

To create a weft backed weave in which the second weft appears on the top of the fabric just rotate the weave in fig. 3 vertically one pick (fig.4).
To create the complementary warped faced weft backed satin weave, I first tried a warped faced satin that was the result of horizontally flipping and inverting the base filling faced satin (fig.5). This would have been optimal in a draft using blocks, but didn’t work when substituted into the mini-Jacquard draft. I found I needed to rotate the base filling faced satin horizontally one end and invert it (fig 6). Extra picks were then inserted and stitch points added, to arrive at the warped faced weft backed satin weave I used (fig. 7).


As my weft backed weaves are based on 12 shaft satins, I needed to design a graphic whose height is a multiple of 12. This would ensure that weaves would match up correctly along repeat boundaries. I developed a three color design with a repeat 24 wide and 96 long (fig.8). Although I created this particular design using a professional Jacquard design system, the personal computer program StitchPainter also supports designing in repeat.

Now it was time to substitute a weave structure for each color in my design. First I created a separate black and white template graphic for each color in the design. As only half the picks in my weave structures are visible, I doubled the height of my template graphics so the final cloth would have the same proportions as my original design (fig.9).
Copying these templates into ProWeave, I constructed a pegplan for my design using the Union and Intersect commands (fig. 10). Note the templates were flipped before applying, so I would be weaving my design right side up.
The next step was warp and weft float correction. I decided to ensure each weft interlaced with the warp at least twice in the 24 end repeat. Care was taken to distribute added stitch points midway between interlacements on the adjacent picks while avoiding creation of spurious twill lines. This was a laborious process as the programs I have that help identify long floats tend to warn about float lengths that were acceptable for this draft.

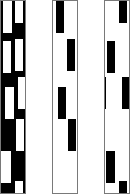
| The last design step was to invert the pegplan, so that I would be lifting fewer shafts as I wove. The final mini-Jacquard draft is shown in fig. 11. I wove samples of this in 150 denier rayon embroidery thread sett at 80 epi using a couple of different weft color combinations. I forgot to flip the pegplan horizontally after inverting it, so the cloth is a mirror image of my design. The cloth is thick but drapes. I can picture using it in an evening jacket with simple lines. |
ProWeave no longer works on my Macintosh, but I suspect the steps in which it was used could be duplicated using Photoshop or Photoshop Elements.
Earlier versions of this article appeared in the June 1999 newsletter of the Complex Weaver’s Computer Aided Design Exchange study group and in the September 2000 issue of the Complex Weavers Journal.